A few tasty, healthy recipes that are easy to make in large quantities. Perfect for potlucks, your family, or for cooking in advance for the week ahead.

Showing posts with label garlic. Show all posts

Wednesday, September 15, 2010

Celery, Quinoa, Jerusalem Artichoke Soup

equipment:
  • 1 large soup pot
  • 1 immersion blender (you can do it with a regular blender, but its such a pain...)
  • 1 pyrex bowl
  • 1 microwave

Ingredients:
  • 1 bunch of celery from the CSA (this is about 2/3 the size of the bunch you would get in a store)
  • 2 medium onions
  • 3-5 cloves of garlic, to taste
  • 1 cup uncooked quinoa.
  • 1/3 lb jerusalem artichokes
  • vegetable broth (if you dont have, add a dash of cumin and turmeric (translate: about 1/4 to 1/2 a tsp of each per 2 cups of water).
  • olive oil for sauteing
  • salt and pepper to taste
  • thyme (dry is fine)
  • sage (fresh or well ground. dont use any big dry leaves).
  • yogurt or cheese- optional


Notes: in short, the recipe uses 1/2 the celery and 1/2 the artichokes you got today. feel free to double.

Instructions:
  • place the quinoa in the pyrex bowl with a touch more than 2 cups of water. place a lid or plate on top of the pyrex bowl and microwave it for 20 minutes on high. (NOTE- if the quinoa is not pre-rinsed, you will need to rinse it ahead of time. Other note to self- this is why you should always buy pre-rinsed quinoa. final note- this is a great way to cook quinoa).
  • wash the jerusalem artichokes well. chop em small.
  • heat olive oil in the bottom of the pot. add the jerusalem artichokes and start to saute.
  • chop the onions small and add them to the pot.
  • chop the garlic and add it to the pot.
  • chop the celery. feel free to include the leaves.
  • when the onions are translucent and the jerusalem artichokes look cooked, add the celery. stir.
  • when the celery looks slightly wilted, add the quinoa.
  • add the thyme & sage
  • add enough vegetable broth so that it covers the mixture by about 2 inches.
  • let it simmer
  • puree with the immersion blender. if you want it thinner, add more broth and let the mixture simmer again.
  • serve hot or cold. great with a dollop of yogurt on top. or some grated cheese.

Jerusalem Artichoke Basics


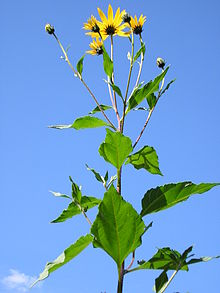
Jerusalem Artichokes are neither from Jerusalem nor an artichoke. They are the root of a beutiful tall yellow flower that looks like a sunflower. The root has a texture like a potato, but with a fun nutty twist.


some basic ways to prepare a jerusalem artichoke:
(be sure to clean them well before cooking)

1. roast them in the oven. chop them up the way you like your roasted potatoes. a touch a olive oil, salt, and pepper is great. The more adventurous can add twists like rosemary. or roast it in combination with other root vegetables (see here for some ideas)

2. simmer/saute
Chop them the way you like your pan sauteed potatoes. Place them in a pot with a lid. add vegetable broth enough to barely cover them. let them simmer. when the broth has boiled for about 6 minutes, remove the lid and let the liquid evaporate so that they can start sauteing in the pan. You may want to add a touch of oil in the last step to help with the saute.
variations: add chopped onions and/or garlic to the pot.

no vegetable broth? no problem.
While this doesnt work for every recipe, the main goal of the broth here is to give the chokes something a little more flavorful than plain water to simmer in. Some quick substitutes include:
  • adding a dash of cumin and turmeric (translate: about 1/4 to 1/2 a tsp of each per 2 cups of water). amazing how cumin can make a broth taste meaty.
  • adding 1 tsp of soy sauce per 2 cups of water
  • adding a touch of miso paste
  • adding star anise

Thursday, October 15, 2009

Fennel with Lentils, Thyme & Chard


recipe inspired by a french dish in Moosewood Simple Suppers (a fantastic cookbook)

Ingredients
  • 1 cup uncooked lentils
  • 1-2 bulbs fennel, finely sliced
  • 4 cloves garlic, minced
  • 2 tbsp dried thyme
  • 1 tbsp olive oil
  • white wine vinegar
  • 1 cup chopped chard- optional. Any other green, including bok choy, could work too (can use more or less, but the raw leaves should not be more than 3/4 the volume of the fennel)

Directions
  • boil the lentils
  • in a separate frying pan, saute the garlic in the olive oil
  • when the garlic is slightly golden, add in the fennel and stir
  • when the fennel is slightly golden (it gets a slight shade of off white darker) add in the thyme and stir.
  • mix in the chopped chard
  • leave on stove top while stirring for 3-4 more minutes or until chard is fully wilted
  • mix the lentils
  • serve with a generous drizzle of white wine vinegar
AMAZING

Wednesday, October 14, 2009

Beets!

My favorite way to eat beats is to roast them.


(dont forget- the green tops are delicious. treat them like any other green).


There are two ways to roast beets:


Roast first- then chop

Chop first- then roast

What you do:

· Wash the beets well, trim off the ends. (peel, if you want)

· Cut the beet into quarters

· Wrap in aluminum foil and place in the over at 375˚ F until soft (about an hour) (Note- the oven time is flexible. I try and roast beets while I am cooking something else in the oven)

· Wash the beets well, trim off the ends. (peel, if you want)

· Chop the beets into small cubes

· Place on a baking tray and drizzle with olive oil

· Roast in oven at 375˚ F- first 15-20 minutes covered, then 10-20 minutes uncovered. (oven temperature can be up to 400˚ F)

Advantages:

· Its much cleaner- few things are messier than chopping uncooked beets- the juices get everywhere and can stain

· Its easier to chop- uncooked beets are very hard, and this method saves you chopping time

· Less cooking time

· More slightly crispy/ caramelized edges

· You can add flavors while roasting- like citrus, garlic, or herbs

· You can roast with other veggies (see below)

Disadvantages:

· Takes longer to cook

· Its much messier- few things are messier than chopping uncooked beets- the juices get everywhere and can stain

· Its harder to chop- uncooked beets are very hard, and this method saves you chopping time


what to do with roasted beets:

  • serve with goat cheese!
  • serve with citrus vinaigrette or honey mustard vinaigrette
  • serve in a salad (or in a salad with goat cheese)


Sweet Beet & Veggie Roast

  • chop the beets (see above)
  • chop parsnip & carrots & red onions
  • optional- garlic cloves still in the peel (see below)

  • place in lasanga pan
  • drizzle with olive oil
  • roast covered, and then uncovered in a 375˚F oven

  • veggies are done when they are super tender (time will depend on how many veggies you have, but its usually at leats 40 min)


Savory Beet & Veggie Roast

  • chop the beets (see above). but beets are optional.

  • chop parsnip & carrots & onions & turnips
  • add garlic cloves- peeled or unpeeled. see below.

  • optional- chop a fennel bulb

  • place in lasanga pan
  • drizzle with olive oil
  • optional- mix in crushed dried rosemary, dried oregano, dried basil, (any of the above, all of the above, or other herbs of your choice)
  • optional- mix in chopped greens (like beet greens, collard, kale, chard, etc). volume of veggies should be around 1/3 volume of whole dish when raw. Maximum 1/2 of dish)

  • roast covered, and then uncovered in a 375˚F oven

  • veggies are done when they are super tender (time will depend on how many veggies you have, but its usually at least 40 min)


Note about the garlic:

  • you can roast the garlic peeled or unpeeled
  • if you peel it, the garlic will better flavor all the other veggies
  • if you roast the individual cloves while still in the peel, the cloves will get soft and caramelized, and will pop right out of the peel when fully cooked
  • I like both- so I always put in some cloves peeled and some unpeeled.

Tuesday, September 29, 2009

Bok Choy

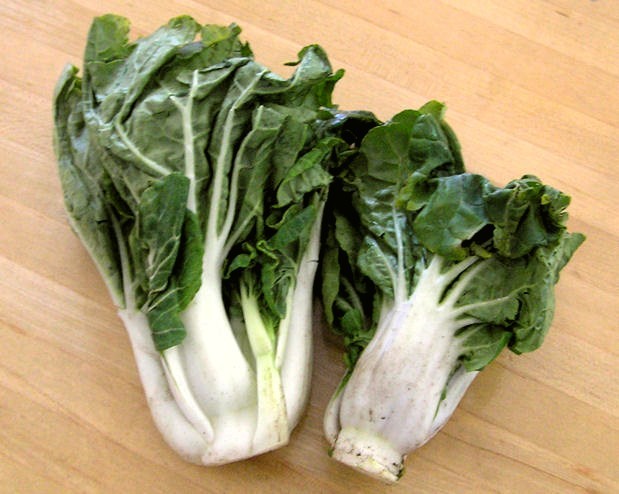
... also known as chinese cabbage.

You might see it in its adult variety:

or as baby bok choy:

adult bok choy should be cooked, but baby bok choy is tender and can be eaten raw or cooked.

for adult bok choy:
* wash well, though it is rarely as sandy as other greens
* It can be lightly sauteed, or sauteed until well done like other greens
* saute with soy sauce (extra good additions include onions, garlic, and/or mushrooms)
* sauteed bok choy is excellent with sesame peanut noodles or with tofu.

for baby bok choy:
*great in salads. tasty dressings include:
** peanut sauce dressing
** a touch of teriyaki sauce
** vinaigrettes, especially fruity vinaigrettes
* here is an excellent tahini bok choy salad recipe
*can be roasted (and then served with any of the above toppings)

other suggestions?

Greens!

Some people don’t like greens- but that’s usually because they’ve had greens that are either (1) cooked into a mush or (2) undercooked, and therefore tough and bitter. Here is how to easily cook your big leafy greens so that they are well cooked, not mushy, and delicious


Ingredients:

· 1 bunch of Greens (can be collard, mustard, kale, turnip, beet, chard, etc. all are delicious)

· 1 large onion or 2 medium onions

· garlic cloves, chopped (2-8, depending on your taste)

· olive oil

· 2 tsp salt (kosher or coarse sea salt, preferably not table salt).

Directions

· utensils:

o use a pot or pan with as much surface area on the bottom as possible. Pan should be stainless steel or cast iron (NOT non-stick/Teflon- unless that’s all you have). Pan MUST have a lid. my favorite is the glass lid chicken fryer (image on the right):

· chop the onions

o chop into slivers or dice it into cubes (around ½ inch cubes work- doesn’t have to be super fine, but bigger pieces take a lot longer to cook)

· sautee the onions till translucent

o heat about 3 tbsp of olive oil in the pan. When the oil sizzles when you splash a drop of water into it, add the onions

· wash and chop greens while onions cook

o greens can be be very sandy- so they need to be washed well. Some methods include:

§ running each leaf under a stream of water

§ filling your sink with water and letting them soak so that the sand falls to the bottom

§ if you're using a textured green like Kale, then make sure all the sand is gone from the harder to wash textured parts of the leaves

o chop leaves in a checkerboard pattern- cut them vertically and then horizontally so you have manageable sized pieces. Chop stems into small pieces.

· add greens to the onions, add 1/3 c water, 2 tsp kosher salt. stir and place lid on

o greens are very tough, so allowing them to steam for a while softens them and reduces your cooking time.

o The salt sucks some of the moisture out of the greens and allows them to soften further

· when greens have shrunk significantly, open the lid and stir. Add another splash of olive oil (approx 2-3 tbsp) and stir more.

· At this point your goal is to cook the greens to that they are almost brown without burning them.

o if you kept steaming them, they would turn into unpleasant green mush. So now you want to sauté them to make them a bit crispy and full of texture.

o this requires frequent stirring so that all pieces get time on the bottom of the pan, and adding another splash of olive oil while cooking, and possibly some more salt to your taste

· When the greens start to brown, add the garlic and another splash of olive oil and stir.

· When finished, your greens should be:

o A very very dark shade of green

o Smell very fragrant (garlic, and onions and olive oil- yum!)

o Be very very well cooked. Its hard to overcook greens once you stop steaming them, so keep them on the stove top for as long as possible until they are to your liking!